본문은 야곰 아카데미 커리어 스타터 캠프를 통해 학습한 내용을 회고한 글입니다.

데이터 전달
데이터를 전달 해줄 수 있는 여러 가지 방식을 알아보도록 한다. 그러기 위해서 프로젝트를 하나 만들어봤다.
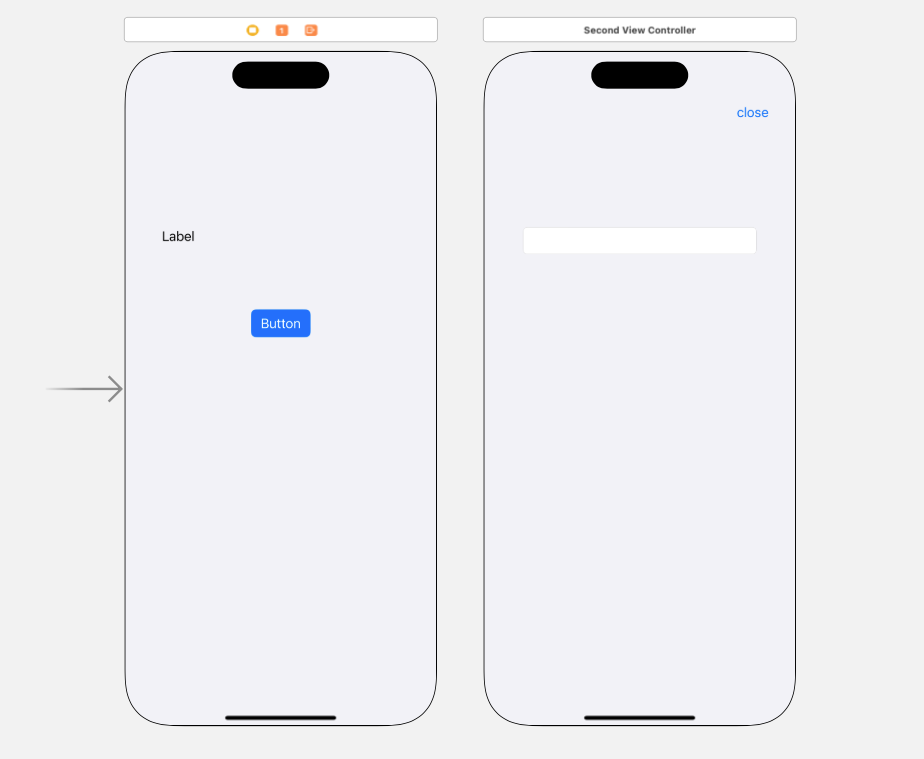
두개의 뷰로 구성했다. 첫번째 뷰에는 라벨이 있고 버튼이 있다. 버튼을 누르면 두번째 뷰를 모달로 띄워준다. 두 번째 뷰에는 닫기 버튼과 텍스트필드가 있다. 텍스트 필드에 내용을 입력하고 닫기 버튼을 누르면 첫번째 뷰에 뜨게 할 생각이다.

이런 식으로
델리게이트
첫번째 뷰 컨트롤러
//  FirstViewController.swift

import UIKit

protocol SendDataDelegate {
    func fetchString(text: String)
}

class FirstViewController: UIViewController, SendDataDelegate {
    func fetchString(text: String) {
        label.text = text
    }

    @IBOutlet weak var label: UILabel!
    @IBOutlet weak var button: UIButton!

    override func viewDidLoad() {
        super.viewDidLoad()
    }

    @IBAction func touchButton(_ sender: UIButton) {
        guard let secondViewController = self.storyboard?.instantiateViewController(withIdentifier: "secondViewController") as? SecondViewController else {
            return
        }
        secondViewController.delegate = self
        secondViewController.modalPresentationStyle = UIModalPresentationStyle.fullScreen
        self.present(secondViewController, animated: true)
    }

}
SendDataDelegate라는 이름의 프로토콜을 만들어주었다. 그리고 첫번째 뷰 컨트롤러는 SendDataDelegate를 채택한다. 이제 이 친구가 꼬붕인 것이어요.
그 다음에 FirstViewController안에 fetchString을 정의해준다. label의 텍스트에 text라는 값을 넣어주는 것이다.
그리고 touchButton에 있는 secondViewController를 다운 캐스팅 해준다. self.storyboard?.instantiateViewController(withIdentifier: "secondViewController")까지만 했을 때의 결과는 UIViewController이기 때문이다. 그리고 secondViewController.delegate를 self, 즉, FirstViewController로 지정해준다.
두번째 뷰 컨트롤러
//  SecondViewController.swift

import UIKit

class SecondViewController: UIViewController {

    var delegate: SendDataDelegate?

    @IBOutlet weak var textField: UITextField!
    @IBOutlet weak var closeButton: UIButton!

    override func viewDidLoad() {
        super.viewDidLoad()
    }

    @IBAction func touchCloseButton(_ sender: UIButton) {
        delegate?.fetchString(text: textField.text!)
        self.dismiss(animated: true)
    }


}
delegate라는 변수를 만들어준다. 이것의 타입은 옵셔널 SendDataDelegate이다. 이 delegate라는 친구는 밑에 있는 touchCloseButton에서 사용된다. delegate 안에 있는 fetchString을 호출할 수 있게 되는 것이다. 물론, 직접적인 일은 FirstViewController에서 진행한다.
노티피케이션 센터
첫번째 뷰 컨트롤러
//  FirstViewController.swift

import UIKit

class FirstViewController: UIViewController {
    func fetchString(text: String) {
        label.text = text
    }

    @IBOutlet weak var label: UILabel!
    @IBOutlet weak var button: UIButton!

    override func viewDidLoad() {
        super.viewDidLoad()
        NotificationCenter.default.addObserver(forName: .init("showText"), object: nil, queue: .main) { noti in
            guard let object = noti.object as? String else {
                return
            }
            self.fetchString(text: object)
        }
    }

    @IBAction func touchButton(_ sender: UIButton) {
        guard let secondViewController = self.storyboard?.instantiateViewController(withIdentifier: "secondViewController") as? SecondViewController else {
            return
        }
        secondViewController.modalPresentationStyle = UIModalPresentationStyle.fullScreen
        self.present(secondViewController, animated: true)
    }

}
두번째 뷰 컨트롤러
//  SecondViewController.swift

import UIKit

class SecondViewController: UIViewController {

    @IBOutlet weak var textField: UITextField!
    @IBOutlet weak var closeButton: UIButton!

    override func viewDidLoad() {
        super.viewDidLoad()
    }

    @IBAction func touchCloseButton(_ sender: UIButton) {
        NotificationCenter.default.post(name: .init("showText"), object: textField.text)
        self.dismiss(animated: true)
    }


}
다음엔 싱글톤과 클로저를 사용해서 리팩토링해보도록 하겠다.
'YAGOM CAREER STARTER' 카테고리의 다른 글
| [TIL] 20230123: unit test, TDD, filter, reduce (0) | 2023.01.23 |
|---|---|
| [토요스터디A반] 20230121: UML을 바탕으로 코드 작성하기 (0) | 2023.01.23 |
| [TIL] 20230116: Refactoring with delegation (0) | 2023.01.18 |
| [TIL] 20230113: Protocol2 (0) | 2023.01.14 |
| [TIL] 20230112: Closures (0) | 2023.01.13 |


